Showing posts with label gallery wall. Show all posts

Feb 6, 2012

Valentine's Day decor, part two


Hey all, and happy Monday! Hope you had a great weekend. Mine ended on a sad note because a certain team couldn't manage to win a certain game...but let's not talk about it! :)

On Friday I showed you my Valentine's Day vignette on the floating shelves in the living room.

I also gave our gallery wall in our kitchen a little V-day love. I think my favorite part about a gallery wall is that you can change it on a whim and give it a new look in just a few minutes.

The hubs walked by afterward and slowed down to look at it. "This thing is always like a surprise to me," he said. Love it! :)


To bring some love to this wall, I added wedding photos of our parents and this one of my great-grandparents. I love it next to the black-and-white photo of us.


My in-laws. And I added a photo of the Eiffel Tower, because what's more romantic than Paris?


My parents on the left and a photo of us from our engagement shoot, each matted with some cardstock.

I also added these love quotations that I printed out for our wedding, but never used. Of course I kept them just in case I'd want to use them for something else...and look, I did!


I framed some of those cutie crocheted hearts I showed you last week on some cardstock.


This big puffy LOVE is from Target last year. You might recognize it from last year's vignette on the floating shelves. I love reusing items, especially holiday-themed ones, so I don't have to keep buying decor items that only get put out for a couple weeks out of the year.


What's this, another LOVE sign? Yep! I made it using a piece of oak, some stain, painters' tape and white paint. I'll show you more on it later. I still gotta paint that edge white, but I was too excited about it not to get it up and show you.


A couple more photos!


Sep 7, 2011

Gallery wall, take two


Hey all! Thanks for your nice words on my convex mirror and my new kitchen faucet! And a big HEY! to my new followers...I'm so glad to "see" you. :)

Waaay back in February, I posted about my first gallery wall.


After living with it for a few months, I decided I wanted to do it again -- bigger, better, faster, stronger! (Okay, not those last two...but the first ones, definitely!). And, after hemming and hawing over it, I decided I wanted to do white frames instead of wood-toned frames. As much as I love me some nice wood tones, our kitchen is full of wood (oak floors, those oft-mocked oak cabinets), and I thought some white would provide needed contrast and lighten things up.

(And no, I don't believe all frames in a gallery wall have to match, but that's how I like to roll!).

Once I decided on white frames, I popped over to Target. I'm super jealous, by the way, of all of you and your awesome Ikeas -- which, according to practically every blogger out there who's done a gallery wall, is the best place to buy frames in all kinds of sizes and for good prices. Sadly, the closest Ikea is three states away (I've never even been to one!), so I had to settle on Target. They don't have tons of options, but luckily the frames were on sale, so I grabbed a bunch. I gave a few of my wood frames a little white spray paint makeover too.

To decide on a layout, I traced my frames onto old wrapping paper, cut out the templates and did the ol' stick-'em-on-the-wall thing, moving them around until I got a layout I liked.


It was at this point that I informed the hubs of what I was doing. He squinted at it, and said, "Can I tell you my honest opinion?" Yikes! I was so afraid he was going to veto it, but he simply said, "All the frames should be the same color." Phew. I guess we're on the same wavelength!

Then came the tedious process of measuring, marking and hammering. Let's skip that boring stuff and see the final result!


Okay, now, before you say anything -- it's not quite done. I'm still working on a couple things to fill those two empty spots...


You'll just have to wait and see what goes there!

How about a little tour of what's in those frames? Not all of them are quite finalized, but they're good placeholders.

We've got a couple prints of two of my favorite places: Paris (a print I bought when I was there in 2005)...


And one of Quebec, which I just bought this summer when the hubs and I went there for our anniversary. Above that is a photo I took while I was in France.


A postcard the hubs got from London, a cute beach photo and my DIY botanical art...


And some more free botanical art: I picked some fern leaves from my backyard, pressed them in books and framed them in these floating frames I had kicking around. Sadly, some of the fern leaves are turning brown, so these are likely placeholders until I find something better to fit those 10x10 frames. I thought about mounting them on paper, but I kind of like the green-on-green action.


Some new paint chip art I made. I like this one better than my first one (which you can see here).


A piece of seaweed I stole from the beach, all dried out and mounted onto cardstock...


Remember those zinc letters I bought earlier this summer? I love how they look mingled in with all these white frames.


Next to those, I channeled John and Sherry from Young House Love and framed the one-and-only photostrip of the hubs and me. It was totally random -- I found it while sorting through some old papers, and decided to use it as a placeholder. But I'm kind of liking it! If you don't know Young House Love (and how can you not?!), those two are all about the photostrips, and included a few in their hallway gallery.


To continue the lovey-dovey theme, I also printed out some lyrics to our first dance song ("All I Want Is You" by U2) onto a piece of tea-stained paper. Can I get a holla for free and sentimental art??


Another cheapo-art trick: The below print is actually the card advertising a new exhibit at an art gallery (the info is printed on the back). Popped in a frame, it looks like something I spent money on...but I didn't! (I totally wish I DID have the money to buy this artist's original work, but for now, this card will have to do).


And, that's what this is too. I prefer "frugal" to "cheap," thank you very much!


A couple more photos, just for funskis!


Did you spot the local art I actually DID buy? It's the leaf monotype in the center!


I didn't really have a theme when I was putting the art in, but I like all the greens, blues and grays, with an occasional pop of orange and yellow. But I'll probably switch out what's in some of the frames for new photos...it's only been up for a couple weeks and I'm already itching to see something new!

What do you think? I'm really digging it! I'd love to extend it even further and bring the frames down towards the floor, but for now I've got to put the funds towards something besides white frames, you know? Maybe someday I'll get to go to Ikea and buy some of those awesome ones all the other bloggers rave about!

And the requisite before-and-after shot...
You can see we decided to move that little bench thing (which, actually, IS from Ikea -- the only thing I've ever bought from Ikea, ordered online) into the dining room. I don't think it'll stay there, but it's currently holding our cookbooks, so it's nice to have those handy. It wasn't the right scale for this big wall, and it made this area feel a little cramped -- it leads from the entryway to the rest of the house, so openness is a must. (Too bad we have to stare at that baseboard unit though...).

Have you done a gallery wall, only to take it down and redo it a few months later -- or am I the only crazy one?

Linking up!


May 12, 2011

We're so vain: Displaying wedding photos


The hubs and I love to look at ourselves. A lot. Okay, not really, but I do love looking at our wedding photos, even 11 months (to the day!) later. When we first moved into the house, we felt weird about putting wedding photos up -- like it was vain. But heck, we spent all that money on the day and while I'm not going to bust out the "best day of my life" cliche, it was a pretty darn good time. Plus, our photographer Clare Norton took absolutely fantabulous photos that really go to waste just sitting on my hard drive.

I know some people probably feel that wedding photos are best left to a bedroom or another private area, and I totally get that. But I love having the photos around as reminders, and I like looking at other people's wedding photos when I visit them.

It still took us a little while to figure out how to display the photos. A blank wall next to the front door ended up being the perfect spot for a three-photo vertical frame we got as a wedding present. I opted to pick three photos that were more natural looking, not too posed and not just close-ups. You know, so people wouldn't feel overloaded by smiling happy wedding people. They're on the right in the photo below.


I also keep a photo on my bureau, in a Lenox True Love 5 x 7 frame. A cute story: We registered for and received a couple of these in 8 x 10. The hubs went out about bought the 5 x7 one and had it engraved with our names and wedding date as a surprise to me. He then put it back in its box and "hid" it in a big box with the other frames we got as wedding presents (but hadn't opened yet). I decided to do some unpacking and started opening all the frame boxes, and found one that had been engraved. 

Thinking a guest had done it, I felt super bad that we'd written someone a thank-you note and failed to mention the engraving. When I told hubby about it, he said HE actually did it. Woops. But it was still a very sweet surprise. The frame is reflective so it's hard to see the engraving, but it's on the top and bottom.


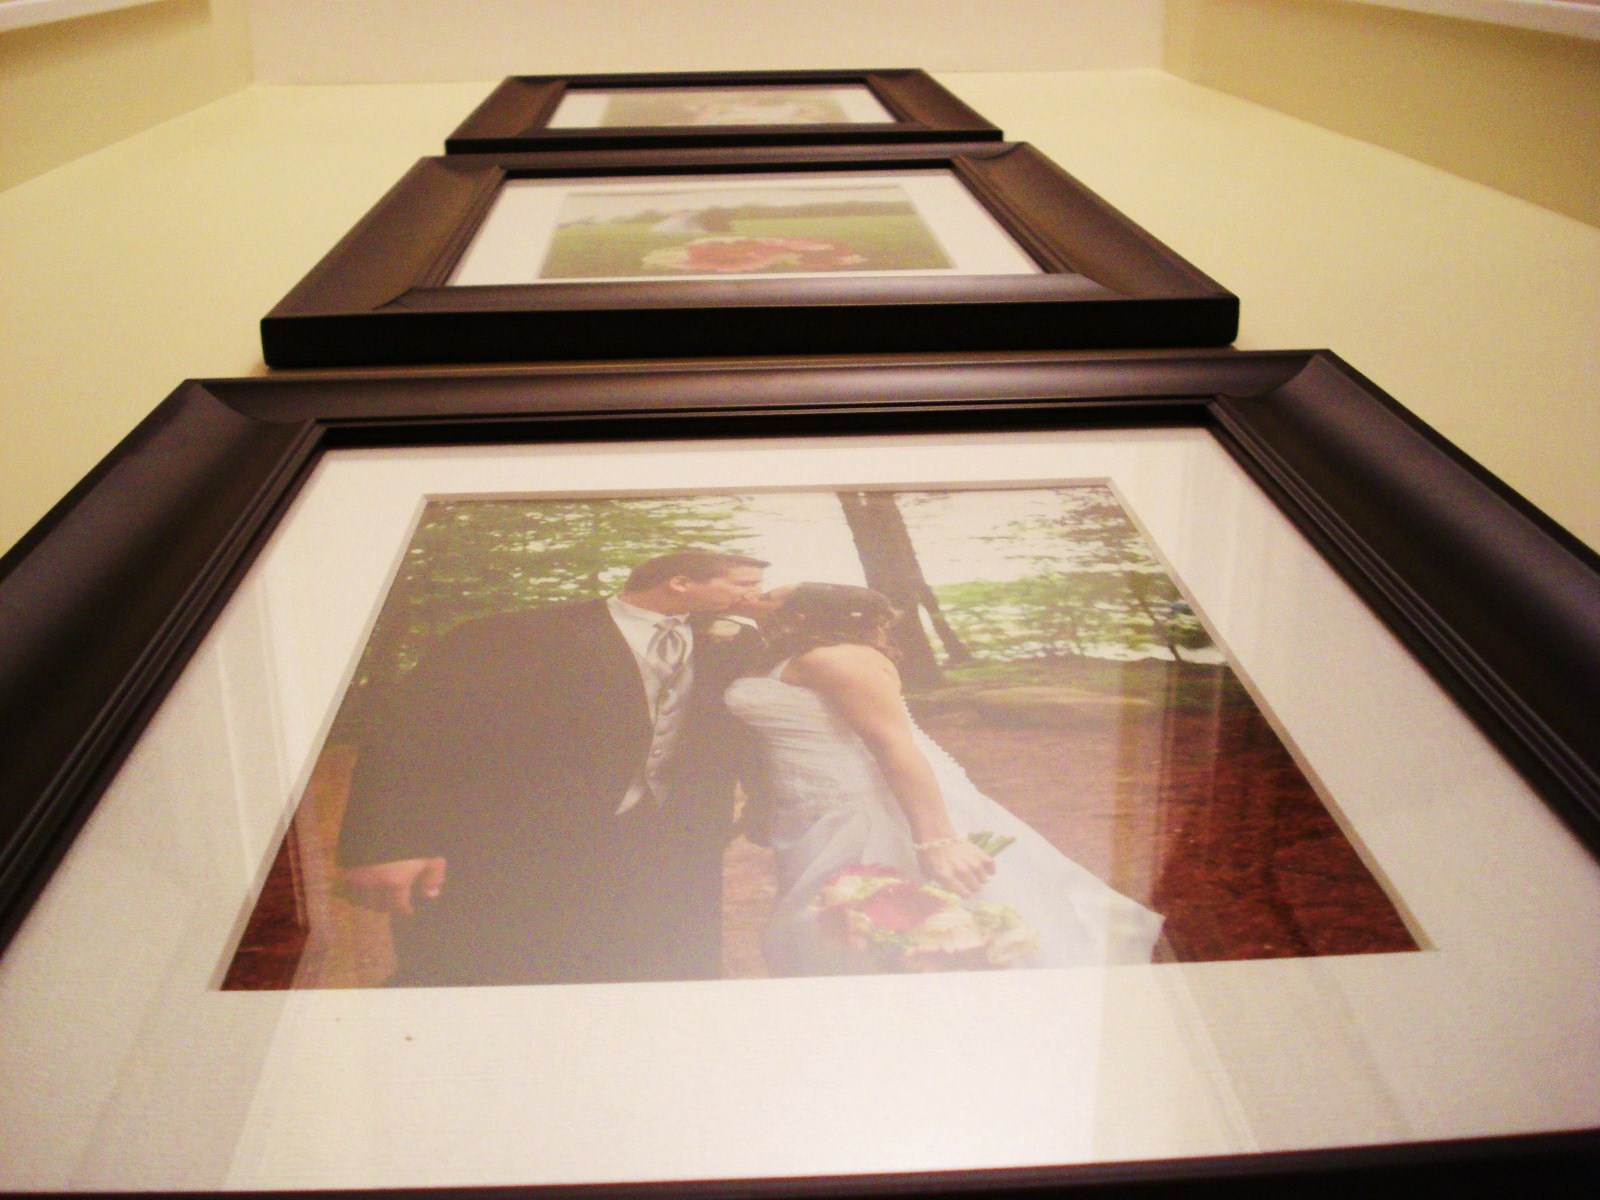
But this still wasn't enough wedding for me (crazy!). So, when I saw F & S's gorgeous wedding photo display at Our Little Beehive, I knew I wanted to do something similar in our empty upstairs hallway. I bought three frames at Michaels for 40% off and printed off three of my favorite photos using Shutterfly.

To hang the photos, I used my tried-and-true paper template method. I started by placing the one in the middle. It looked weird to center it vertically, so I just kind of eye-balled how high I thought looked natural (a little below eye level). Then, I put up the templates for the other two frames, focusing on keeping the spacing even between the frames. Sorry, no photos of the process, but it's pretty similar to how I made my map wall and gallery wall.

I got out my hammer, level, tape measure and picture hangers and got to work. Starting with the middle frame, I measured to make sure it would be centered horizontally. Once I got that one up and level, I used it as a guide to measure where the hooks for the bottom one should be, then the top one. I was ridiculously proud of myself for getting all three frames even and level without even making one errant hole in the wall!


(Is it wrong that all the wedding photos we display are just of the two of us -- no family, no guests?? Maybe we really are vain...)

I picked three photos that I thought had similar coloring; each one had lots of vivid green, which really makes me feel cheerful. Again, I avoided the posed formals and went with more natural ones to keep the arrangement from being too formal.


This wall is the end of our upstairs hallway and directly across from our bedroom door, so we get to look at these photos every time we leave the bedroom. Love it! We saved the bigger photos for a more private area of the house; we're the only two who regularly go upstairs, so it's mostly for us.

But once it was up, the hubs (who was really hesitant about putting big wedding photos up) said it looked so good we should move it to the living room so everyone can see it. But after all that successful measuring and nailing, I wasn't about to take it all down and press my luck by trying to do it again. Also, we don't have the paint for the upstairs hallway, so no way to patch the holes I made without repainting the whole thing. And I'm all set with painting for a while after our double-round in the office.

Speaking of the office, we did go buy our desk. But after the hubs spent two hours assembling it (and didn't even finish!), we encountered this:


If it were in the back or underneath, we may have overlooked it. But this is front and center. Luckily, the manufacturer, Sauder, has a five-year warranty and lets you order replacement parts online. In less than five minutes, I ordered a replacement top that should be delivered right to our house in just a few days. Between that and our purple paint mishap, I guess we should just assume this office makeover is cursed.

But going back to photos -- I do plan on turning the whole upstairs hallway into a family photo gallery, putting up photos, both current and old, of our families. And I'm still planning to do photo ledges in the dining room and would love to showcase more photos of our family and friends, not just the two of us. That redeems our wedding photo vanity, right?? :)

Feb 13, 2011

My first gallery wall

We have a nice big wall in the kitchen that was begging for a gallery of photos. I love the look and how much latitude you have to make it personal and unique. The blogosphere is full of gorgeous gallery walls for inspiration that are all different but all beautiful:


All other photos from Decorpad 

But I was a little nervous to tackle it myself. I contemplated it for a while, but was stricken with indecision. I envisioned putting dozens of nail holes in the wall that the hubs would have to fill when all was said and done. 

But that big wall kept staring at me, imploring me to give it a shot. Since I'm not great at visualizing something, I knew I couldn't just launch into it without a plan. So I grabbed some old wrapping paper to make templates.

I had two chunky, matted 8x10 frames I wanted to use, so I started with tracing them onto the backside of the wrapping paper and hanging them up on the wall with Scotch tape. 

Then, I grabbed some random 5x7 and 4x6 frames I had around the house and traced them to make templates. I arranged them around the 8x10 frames, trying to keep even spacing and vary the horizontal and vertical orientations. Luckily, the Scotch tape allowed me to pull things off and re-stick them easily without damaging the wall.

I ended up with this:


What's on the back of the paper? Dinosaurs.


Once I knew how many frames I needed and how big they needed to be, I headed out to Target (where else?) and stocked up on some more that would coordinate with the ones I had. 

Then began the fun part -- putting holes in the wall. For each frame, I measured how far the hook was from the top of the frame...


...and then measured and marked that on the paper template. I actually put the nail in right into the paper template, then pulled it off.


Then, I hung each frame. I do admit, once I stepped back and looked at it, I did tweak some placement a little (but luckily those holes are still covered by the frames. Don't tell hubby...). I also decided to add a frame on the bottom left that wasn't in my original layout.


I was a little nervous about mixing wood tones, but I think it still looks cohesive (except that really light one in the center, which I'm planning to sand and stain a shade darker). 

It fills the space much better than just the two big frames alone.


Want to take a virtual tour of the photos in the frames? Of course you do! (Some of the photos have changed since that last shot above).


For photos, I used a combination of photos of us and landscape shots. The hubs standing on top of Mount Battie in Camden, and one of our favorite lobster shacks on Orrs Island (both in Maine).


Two beautiful and very different beaches: Aruba's Palm Beach on top, and Small Point Beach in Maine.


Clockwise from top, a canal in Venice, lily pads on Webb Lake in Maine, a found pair of flipflops at Popham Beach State Park in Maine. (Not in the shot is a picture of the hubs and I from our engagement session, on the left. It's the same as the shot included in my Valentine's vignette, so I decided you all didn't need to be objected to its lovey-doveyness twice).


And this is me, checking out the scenery (or pretending to, because I didn't have any quarters!) at Land's End in Maine, of course. This photo was actually taken on my birthday in January, when it was unseasonably warm -- I actually put my feet in the ocean!


Making this gallery wall was easier than I thought it would be, and I love the end result. And I definitely like the ability to switch out the photos when I get bored with what's there -- a simple and cost-effective way to refresh the room on a whim.


If you're pondering trying out this trend, go for it! It's not as scary as it seems.

Have you already made a great gallery wall? Share it in the comments below!

Also, I invite you all to like Heart Maine Home on Facebook!