Hi all! Hope your summers are going well so far! Mine has been crazy busy. Seriously, every weekend we've been booked...the summer is flying by!
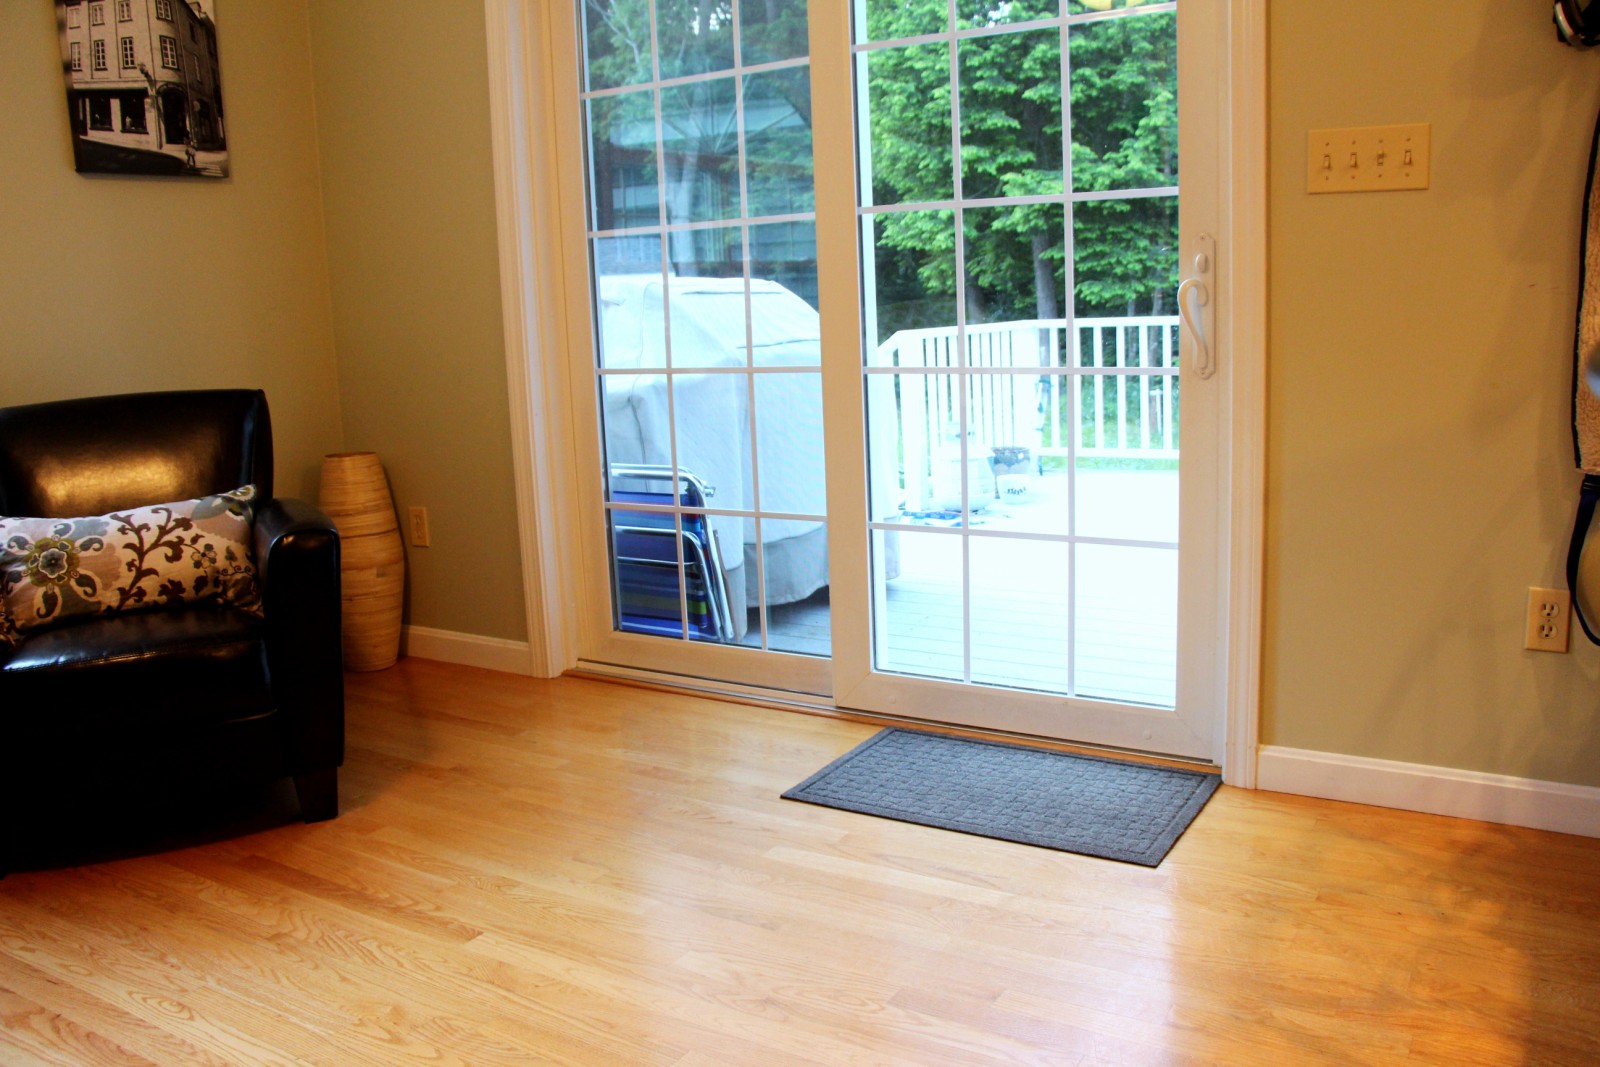
Anyways, I'm popping in to ask for your advice on a rug. While I was shopping around for a rug for the entryway (more on that another day!), I decided I wanted a new rug to go in front of our door that leads to the deck. Don't you love how one project or purchase always leads to another? :)
This door gets a lot of use, because we use it to get to the backyard to take the dog out. So we're always tracking in grass and dirt, and we have at least a couple pairs of shoes there too.
Last year I bought this mat from Target, and it worked pretty good. It was easy to clean and stayed in place with a rug pad. But it was nothing thrilling to look at, and it was just too small. There wasn't enough room to keep shoes, so we were always tripping over them, and when the shoes got pushed off the mat they'd leave dirt and puddles on the floor.
So I was on the search for something bigger and something that was also durable and would hold up to dirt and lots of use.
While at HomeGoods, I stumbled upon this cute little printed jute rug for just $17. I was drawn to the Moroccan pattern and the natural fibers.
But...I wasn't sold on it. This front room is pretty lacking in color, with the wood floors, dark leather chairs and black-and-white art. This rug left me craving a pop of color, but I kept it anyways until I made up my mind.
Then, I happened to walk by this rug on sale on Target. It was a bit more money at $27, but is more substantial with a thicker weave.
It's an indoor/outdoor rug that you can rinse clean, according to the label. It's marked "neon yellow," but it's actually more of a yellow-green, and still just the pop of color I was looking for. And another geometric pattern -- yes! (They sell larger versions of this rug online, but for some reason don't have this size on their website.)
But...I'm not sure about it either. I'm not convinced the color works with the seafoam green of the walls, and the color feels very summery, so it leaves me questioning whether I'll like it in the middle of winter.
So, what do you think? Do you have a favorite? I'm leaning towards the Target rug because of the color and because it seems like it'll last longer, but I'm pondering keeping the other rug and using it in the winter months. I'd love to hear your thoughts!
No matter which rug I go with, it'll definitely be an improvement over what's there now. Although Colby seems satisfied with it. He's so easy to please!
Jun 27, 2013
May 28, 2013
Entryway update
Hi all! I hope you had a great Memorial Day weekend! It finally stopped raining here and the sun came out yesterday, which was really nice. We got to see the parade and spend time outside with my family eating burgers and drinking margaritas...that's my kind of Monday!
I've been a little quiet lately, so I apologize. I've been spending my time working on the entryway. We kind of lost our motivation for a couple months, so I'm trying to get this project back on track -- and get it done so we can move onto other things!
So, the last time you saw this space, it looked like this:
What we had to do next was trim out the gaps between the cabinets and paint the face frames.
The hubs cut and installed the trim, which made such a big difference in giving the cabinets a finished look. He also filled the cracks between the cabinets.
Then I was up for painting. I used a foam brush to apply two coats of Zinser BIN primer, and sanded between the coats. Then I used my Purdy angled cub brush to apply several coats of Behr semi-gloss enamel paint in Ultra Pure White. I used some Floetrol to help extend the drying time to reduce brush strokes. Try as I might, I cannot get a completely smooth surface, so you can still see some brush strokes, but I think it looks pretty good, so I'm satisfied.
We also had to reinstall some of the trim from around the doors, which the hubs nailed into place. He filled the nail holes with wood filler, and then I painted all the trim (so it would all match) with high-gloss Behr interior/exterior enamel, also in Ultra Pure White.
The hubs cut new baseboard, which I painted the same as the other trim, then he installed it and filled the nail holes.
I gave the baseboards one coat of paint to cover the nail holes, but I'll need to do another coat to hide all of the wood filler. I'm hoping to get that done tomorrow, and then we can put the coat rack back up.
It doesn't look like this was a lot of work, but it sure did take a lot of time -- mostly the time to wait while paint dried. Isn't that fun?
It's starting to look like a real room now! Trim makes such a big difference. And now that the cabinets are all painted we can start using them. I'm really itching to start organizing these cabinets, and am super excited for all the new storage space.
But we're not done yet. We still need to make doors for the cabinets (I'm going to use them even without doors, so we'll be rocking the open-storage thing), and the hubs has plans to make a couple drawers too. And I'm working on a coat hook thing to go over the bench, as well as some other things to help keep us organized. And we need to install a shoe rack. Then it's just accessories -- wall decor and some new cute rugs. My favorite part!
I'm hoping we don't lose steam on this again...although I'm guessing it'll be a long time before the cabinet doors are done. But I'm okay if those take some time to get done, since we've never made them before, so it's a big learning curve. I don't mind taking the time to get them done right.
I've been a little quiet lately, so I apologize. I've been spending my time working on the entryway. We kind of lost our motivation for a couple months, so I'm trying to get this project back on track -- and get it done so we can move onto other things!
So, the last time you saw this space, it looked like this:
What we had to do next was trim out the gaps between the cabinets and paint the face frames.
The hubs cut and installed the trim, which made such a big difference in giving the cabinets a finished look. He also filled the cracks between the cabinets.
Then I was up for painting. I used a foam brush to apply two coats of Zinser BIN primer, and sanded between the coats. Then I used my Purdy angled cub brush to apply several coats of Behr semi-gloss enamel paint in Ultra Pure White. I used some Floetrol to help extend the drying time to reduce brush strokes. Try as I might, I cannot get a completely smooth surface, so you can still see some brush strokes, but I think it looks pretty good, so I'm satisfied.
We also had to reinstall some of the trim from around the doors, which the hubs nailed into place. He filled the nail holes with wood filler, and then I painted all the trim (so it would all match) with high-gloss Behr interior/exterior enamel, also in Ultra Pure White.
The hubs cut new baseboard, which I painted the same as the other trim, then he installed it and filled the nail holes.
I gave the baseboards one coat of paint to cover the nail holes, but I'll need to do another coat to hide all of the wood filler. I'm hoping to get that done tomorrow, and then we can put the coat rack back up.
It doesn't look like this was a lot of work, but it sure did take a lot of time -- mostly the time to wait while paint dried. Isn't that fun?
It's starting to look like a real room now! Trim makes such a big difference. And now that the cabinets are all painted we can start using them. I'm really itching to start organizing these cabinets, and am super excited for all the new storage space.
But we're not done yet. We still need to make doors for the cabinets (I'm going to use them even without doors, so we'll be rocking the open-storage thing), and the hubs has plans to make a couple drawers too. And I'm working on a coat hook thing to go over the bench, as well as some other things to help keep us organized. And we need to install a shoe rack. Then it's just accessories -- wall decor and some new cute rugs. My favorite part!
I'm hoping we don't lose steam on this again...although I'm guessing it'll be a long time before the cabinet doors are done. But I'm okay if those take some time to get done, since we've never made them before, so it's a big learning curve. I don't mind taking the time to get them done right.
May 16, 2013
Turning cloth napkins into pillows {DIY}
Hi all! Sorry it's been a little while since I've posted...y'know how life can get sometimes. :)
Today I'm sharing my latest pillows. I'm seriously obsessed with making pillows. I just made these ones out of a curtain. It's probably because it's one of the few things I can manage to sew (kind of)!
My newest pillows are made from cloth napkins I found on sale at Target (where else?). I just loved the floral pattern and the blues, greens and yellows of this pattern. I had eyed these napkins for a while but since I didn't really need them, I made myself walk away...until I saw the orange clearance sticker. The sticker said $6.98, but the receipt said $2.98! What a deal! I bought them with the intention of using them as napkins.
Then at Jo-Ann I saw this turquoise remnant fabric that was half off the marked price, and I snatched that up too, again not sure what I'd do with it but loving the color and thinking it reminded me of the colors already in my living room.
Then it hit me -- make some more pillows!
I simply cut the turquoise fabric for the back and didn't even do anything to the napkin -- I just sewed the pieces together. I sewed as close to the napkin seam as I could. The napkins aren't quite square, so I tried to compensate for that, which I dd only somewhat effectively. So if you look close you can tell my pillows aren't square either, or even the same size. But they're good enough for me!
I already had the pillow forms, so these two pillows cost me about $7 total. The pillows like this that Target sells? 24 bucks. What a deal!
As you can see by my pillow collection, I'm slowly becoming more comfortable mixing patterns in my living room.
I'm sticking to blues, greens, yellows and neutrals to keep things cohesive, but I'm mixing geometric patterns and floral patterns with solids, and I've got an embroidered pillow and a couple linen ones that lend some texture. My new floral ones feel like a breath of fresh spring air.
But my favorite couch accessory? This guy.
What a face!
I'm happy to report Colby is healing well from his knee surgery seven weeks ago. After six weeks of restricted activity, his bones have healed and the vet has cleared him to resume some activity. Yay! He's very happy to be taking walks and joining us on the couch again. He should be able to resume his normal puppy activity in about four weeks, just in time to enjoy the summer.
But back to the pillows. I still have two napkins left in my four-pack. What do you think I should do with them? I think I'm maxed out on pillows for now. Maybe I'll actually use them for their intended purpose...what an idea. :)
Linking up!
Apr 30, 2013
A new (old) coffee table {thrifty find}
Hi all! Hope you had a fantastic weekend! We are having some nice, sunny spring days, and I'm totally loving it.
I've got a couple random things to share today, and I'm super excited about the first one. Our living room has been really evolving over the last year and a half, beginning with our purchase of our sectional coach and more recently with our decision to repaint our living room blue. I'm really loving where the space is at now, except for one problem: a too-big-for-the-space oak coffee table.
This table is solid wood and has held up very well over the years. But style-wise, it doesn't have much anything going for it. And it makes the space in front of the couch feel crowded and we're always pushing it out of the way.
I've been itching to replace it with something smaller and round, to help break up the boxy lines of the sectional. If you follow me on Pinterest, you can probably tell I've been eyeing something gold and glass. Well, after a lot of searching around, I wasn't able to find a table like this in the size and price I wanted.
Plan B was to find a wood coffee table, but let me tell you, it's been pretty hard to find a round coffee table that's only 30 inches in diameter, is made of real wood (no veneer) and is in my price range. We use our coffee table a lot, so I knew I needed something sturdy, which means anything veneered is out. I tried Craigslist a few times but couldn't find anything that fit my criteria.
I kind of gave up for a while, hoping the right thing would come to me. And it did!
This lovely little thing was on Craigslist for just $15! I had to drive over an hour to get it (which the hubs thought was crazy) but I'm glad I did. It's just 30 inches around and made of real wood except for some decorative veneer strips around the edge that are broken and peeling, so I might have to pull them off.
It's been badly refinished at least once, including this nice black matte paint job on the top.
It's definitely seen better days but I think I can fix it up and make it purdy again. I feel like it has a similar feeling as the glass tables I was looking at with its simple lines and its midcentury modern feel.
I'm not 100% sure what I want to do to it. I feel like our living room has a lot of dark furniture, including two wood-toned end tables and a black TV stand and media cabinet. So I think I'll stay away from more wood tones and black. I'd like to do something fun with it, like maybe even stencil the top. I'm thinking something kind of tone-on-tone, to keep it subtle.
Or maybe I want to paint it a fun color...
I also like the two-toned look, whether both the top and legs are painting, or when one half is stained.
And how cute are these casters?!
I'm also really digging the dipped paint trend. I worry it might be too trendy, but I keep envisioning those slim little legs dipped in gold.
Okay, obviously I can't do all of this, so which style do you vote for -- subtle stencil, bright color, two-toned or dipped legs?
I've got a couple random things to share today, and I'm super excited about the first one. Our living room has been really evolving over the last year and a half, beginning with our purchase of our sectional coach and more recently with our decision to repaint our living room blue. I'm really loving where the space is at now, except for one problem: a too-big-for-the-space oak coffee table.
I've been itching to replace it with something smaller and round, to help break up the boxy lines of the sectional. If you follow me on Pinterest, you can probably tell I've been eyeing something gold and glass. Well, after a lot of searching around, I wasn't able to find a table like this in the size and price I wanted.
Plan B was to find a wood coffee table, but let me tell you, it's been pretty hard to find a round coffee table that's only 30 inches in diameter, is made of real wood (no veneer) and is in my price range. We use our coffee table a lot, so I knew I needed something sturdy, which means anything veneered is out. I tried Craigslist a few times but couldn't find anything that fit my criteria.
I kind of gave up for a while, hoping the right thing would come to me. And it did!
This lovely little thing was on Craigslist for just $15! I had to drive over an hour to get it (which the hubs thought was crazy) but I'm glad I did. It's just 30 inches around and made of real wood except for some decorative veneer strips around the edge that are broken and peeling, so I might have to pull them off.
It's been badly refinished at least once, including this nice black matte paint job on the top.
It's definitely seen better days but I think I can fix it up and make it purdy again. I feel like it has a similar feeling as the glass tables I was looking at with its simple lines and its midcentury modern feel.
I'm not 100% sure what I want to do to it. I feel like our living room has a lot of dark furniture, including two wood-toned end tables and a black TV stand and media cabinet. So I think I'll stay away from more wood tones and black. I'd like to do something fun with it, like maybe even stencil the top. I'm thinking something kind of tone-on-tone, to keep it subtle.
Or maybe I want to paint it a fun color...
I also like the two-toned look, whether both the top and legs are painting, or when one half is stained.
And how cute are these casters?!
I'm also really digging the dipped paint trend. I worry it might be too trendy, but I keep envisioning those slim little legs dipped in gold.
Okay, obviously I can't do all of this, so which style do you vote for -- subtle stencil, bright color, two-toned or dipped legs?
Subscribe to:
Posts (Atom)